
Replacing old or inefficient windows can feel overwhelming, but understanding each step makes the process far more manageable. In this blog, you’ll learn exactly how the window replacement process works from start to finish, whether you’re dealing with drafts, rising energy bills, or simply want to improve your home’s comfort and curb appeal. Modern replacement windows can significantly enhance energy efficiency, reduce outside noise, and increase property value. With the right planning, accurate measurements, and proper installation techniques, your window upgrade can transform your living space while delivering long-lasting performance. This detailed blog walks you through every phase with clarity and confidence.
Key Takeaways
- Window replacement typically takes 4-6 hours per ground-level window and requires moderate carpentry skills. The installation time depends on the size of the crew and the difficulty of the job.
- Insert replacement windows preserve existing frames, while full-frame replacement removes everything for a complete rebuild
- Proper measuring, sealing, and flashing are critical for energy efficiency and preventing water damage
Replacing windows in your home doesn’t have to feel overwhelming when you understand the window replacement process from start to finish. Whether you’re dealing with drafty old windows, rising energy bills, or simply want to improve your home’s comfort and curb appeal, this comprehensive step-by-step guide to the window replacement process will walk you through everything you need to know.
Modern replacement windows offer significant improvements in energy efficiency, noise reduction, and home value. With proper planning and attention to detail, installing replacement windows can be a rewarding project that transforms your living space. This guide covers both insert replacement window installations and full-frame replacement windows, helping you choose the right approach for your specific situation.
Phase 1: Planning and Budgeting
Before diving into your window replacement projects, proper planning sets the foundation for success. Start by determining your budget, considering that window materials vary significantly in cost. Vinyl replacement windows typically offer the best value for most homeowners, as they are low maintenance and budget-friendly, while solid wood and fiberglass options provide premium aesthetics and performance at higher price points.
Evaluate energy efficiency ratings carefully, as modern replacement windows can reduce heating and cooling costs by 10-25%. The impact of window replacement on property value is another strong reason homeowners prioritize this upgrade, since new windows are visible and functional improvements that buyers notice quickly.
Decide between DIY installation and professional contractors based on your skill level. While ground-level insert windows are manageable for experienced do-it-yourselfers, full-frame replacements and upper-story installations typically require professional expertise. A conscientious crew should give you regular updates about changes in start and completion times. Check local building codes and permit requirements, as some jurisdictions require permits for window replacement projects.
Phase 2: Measuring Your Windows
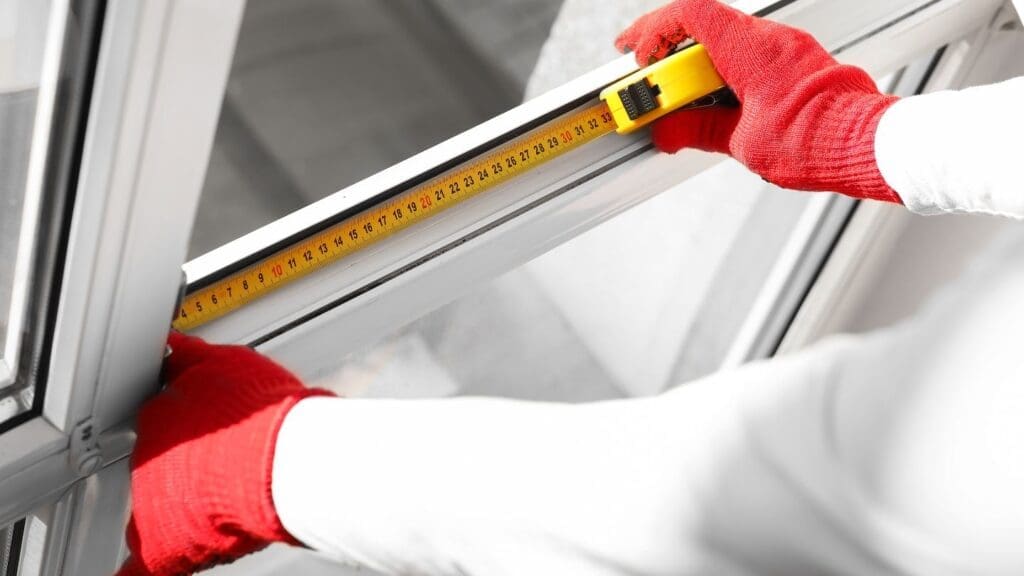
Accurate measurements are crucial for a successful window replacement process. For the existing window frame, measure the width at the top, middle, and bottom of the window opening using the smallest measurement to ensure a proper fit. Similarly, measure the height on the left, center, and right sides of the existing frame, again using the smallest measurement.
Check that the existing window frame is level, square, and structurally sound by measuring diagonals from corner to corner. If diagonal measurements differ by more than 1/4 inch, the frame may be out of square and require full frame replacement rather than insert windows. If you find damaged or rotting wood, remove it and cut new wood to replace it.
Record all measurements twice to ensure accuracy before ordering your new window. Take detailed photos of the current window configuration, including interior trim and exterior trim details, for reference during the ordering process. These photos will help the window company understand your specific installation requirements.
For insert replacement window installations, you’ll typically need to deduct 1/4 to 1/2 inch from your rough opening measurements to allow for proper shimming and adjustment during installation.
Phase 3: Selecting and Ordering Windows
Choose between insert replacement (pocket window) or full frame replacement based on your existing frame condition. Insert windows work well when the original window frame is structurally sound and square, preserving your interior trim and exterior trim while reducing installation complexity.
Full-frame windows are necessary when the existing opening requires structural repair, size changes, or when the frame shows signs of rot or damage. This approach removes everything back to the rough opening, allowing for complete reconstruction and optimal energy efficiency.
Select appropriate window types for each room. Double hung windows work well for traditional homes, while casement windows provide excellent ventilation and modern appeal. Picture window installations maximize natural light in living areas, and sliding windows suit contemporary designs. Beyond function, the right window style can significantly boost your home’s curb appeal by sharpening exterior lines and giving the home a fresher, more updated look.
Compare options at showrooms, online retailers, or home improvement stores to find the best combination of features, warranty, and price. Order windows with a 2-4 week lead time for custom sizes and configurations, and verify warranty terms and maintenance requirements before finalizing your purchase.
Consider energy efficiency features like low-E coatings, gas fills, and quality weatherstripping that significantly impact long-term performance and utility savings. For homeowners dealing with heavy wind, rain, or seasonal storms, working with storm replacement window experts helps ensure you choose windows engineered for local weather demands and long-term durability.
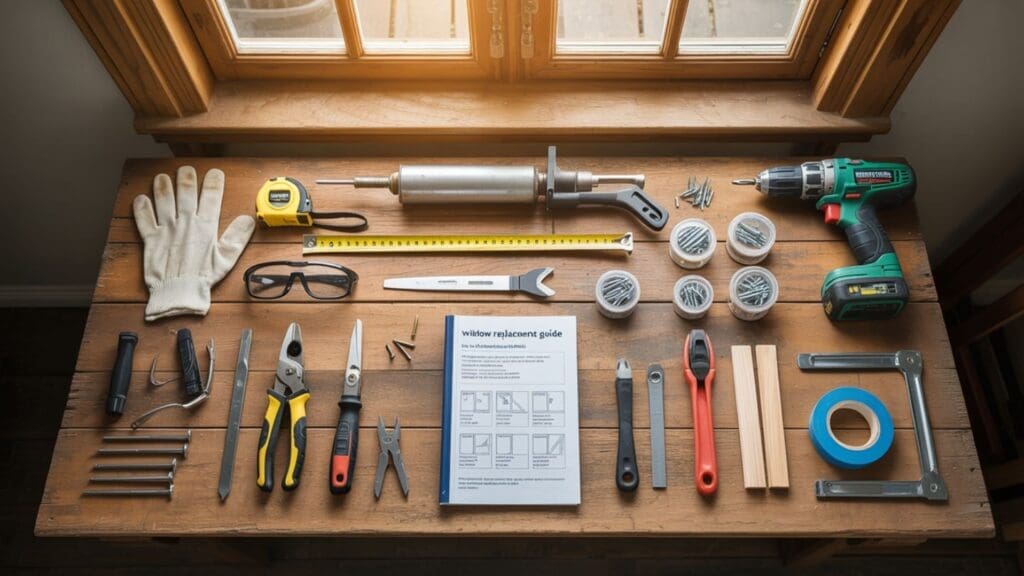
Phase 4: Gathering Tools and Materials
Essential tools for the installation process include a tape measure, hammer, flat pry bar, putty knife, caulk gun, and cordless drill. Cutting tools like a utility knife, oscillating saw, and paint scraper ensure precise work when removing old windows and preparing the opening.
Critical materials include flashing tape for weather sealing, silicone caulk for air seal applications, polyurethane spray foam for insulation gaps, wooden shims for leveling, and appropriate screws for securing the new window frame. Quality materials directly impact the longevity and performance of your installation.
Safety equipment is non-negotiable: safety glasses protect against glass fragments, work gloves prevent cuts during handling, and drop cloths with plastic covers protect your home’s interior. For homes built before 1978, lead paint testing and appropriate containment measures are essential.
Have wood filler and replacement wood pieces ready for frame repairs that may be discovered during the removal process. Fill any holes with wood filler and make sure you have solid wood where you’ll screw the new window into the frame for stability. A well-organized workspace with all tools and materials readily accessible streamlines the installation and reduces project time.
Phase 5: Preparing the Work Area
Clear furniture, decorations, and pets from the installation area to create a safe, efficient workspace. Remove window treatments like blinds, shades, and curtains carefully, storing hardware and components for reinstallation if desired. Clear away any furniture or pets located directly in front of the windows and doors being replaced.
Protect floors and surfaces with drop cloths and plastic sheeting, extending coverage well beyond the immediate work area to catch debris and dust. Ensure clear access paths both inside and outside for moving large windows safely, particularly important for installing windows on upper floors. Provide access to areas where ladders will need to be set up for the installation crew.
Test for lead paint if your home was built before 1978, as disturbing lead-containing surfaces requires special containment and certified professionals. The EPA’s RRP (Renovation, Repair, and Painting) rule mandates specific procedures for lead-safe work practices.
Remove storm windows first by carefully lifting out frames or unscrewing mounting hardware. Use a utility knife to score along the edge of the storm window frame before removing it. Clean the existing opening thoroughly, removing accumulated dirt, old caulk, and debris that could interfere with the new window installation.
Phase 6: Removing the Old Window
For Insert Replacement
Start by removing storm windows first, then proceed to remove the window sashes by carefully prying out parting stops and disconnecting sash cords or balance mechanisms. Work slowly to avoid damaging the existing frame that will remain in place.
Clean the window opening thoroughly and inspect for damage, rot, or structural issues that might require attention before installing the new window. The existing frame and most interior trim remain intact, making this the least disruptive replacement option.
Keep all removed components organized, as some hardware may be reusable or needed for reference during the new window installation.
For Full-Frame Replacement
Score around exterior stops with a utility knife to break paint bonds, then carefully pry them off using a flat pry bar. Remove interior and exterior trim systematically, saving pieces that can be reused to maintain consistency with the rest of the house.
Cut through nails holding the old frame to the rough opening using a reciprocating saw, taking care not to damage the surrounding framing. Remove the entire window frame completely and clean the rough opening thoroughly, preparing it for the new window frame installation.
Inspect the rough opening for water damage, rot, or structural issues that require repair before proceeding with the new installation.
Phase 7: Installing the New Window
Preparation Steps
Apply flashing tape to the sill first, extending up the vertical legs of the window opening to create a water-resistant barrier. This critical step prevents moisture infiltration that could cause long-term structural damage.
Level the sill using wooden shims, securing them with screws, and applying additional flashing tape over the shimmed areas. A level sill ensures proper window operation and weatherproofing throughout the window’s lifespan.
Dry-fit the new window to verify proper fit and identify any adjustments needed before final installation. This step prevents complications during the permanent installation process.
Apply a continuous bead of silicone caulk to the interior head, stops, and sill where the window frame will contact existing surfaces, ensuring a complete air seal around the perimeter.
Window Installation
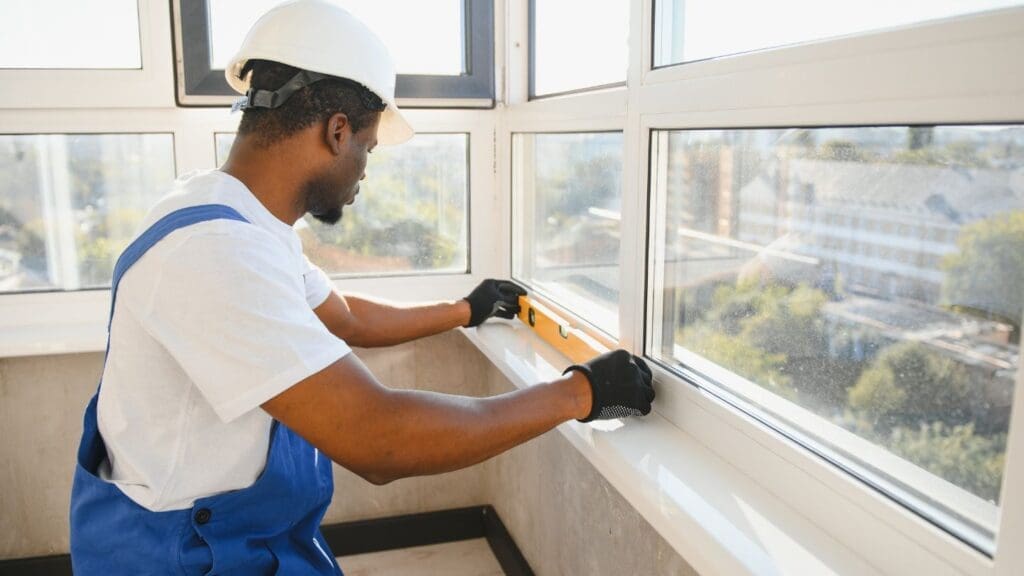
Set the window firmly against the caulk bead and center it carefully in the opening. For full-frame windows with nailing flanges, ensure the flange sits flat against the exterior sheathing for proper attachment and weather sealing.
Secure the window with shims at corners and check that the installation is plumb, level, and square using a quality level and measuring diagonals. Adjust shims as needed to achieve perfect alignment before final fastening. Check the sill for levelness and use shims if necessary to ensure it is level before installing the new window.
Fasten the window to the frame with screws according to the manufacturer’s specifications, typically every 8-12 inches around the perimeter. For nailing flange installations, use corrosion-resistant fasteners that penetrate at least 1 inch into solid framing.
Test the window operation multiple times by opening and closing sashes to ensure smooth function without binding or excessive force required.
Phase 8: Sealing and Insulation
Fill gaps between the window frame and opening with low-expansion polyurethane spray foam, working in thin layers to prevent over-expansion that could distort the frame. Quality foam insulation improves energy efficiency and reduces air infiltration significantly.
Allow foam to cure for 24 hours before trimming excess material with a sharp utility knife. Over-curing creates a stronger, more stable seal that maintains performance over time.
Apply exterior sealant around the window perimeter to prevent water infiltration, using high-quality polyurethane or silicone caulk designed for exterior applications. Proper exterior sealing is crucial for long-term weather resistance. Apply spray foam insulation around the gaps of the new window from the outside to ensure it is airtight and waterproof.
Install or replace interior trim and exterior trim, securing with appropriate fasteners driven into solid framing rather than just drywall. Well-secured trim maintains a professional appearance and provides additional air seal benefits.
Seal all trim joints with high-quality latex caulk, tooling the joints for a smooth, professional appearance that complements your home’s architectural style.
Phase 9: Post-Installation Inspection
Check carefully for dents, scratches, or damage on glass surfaces, frames, and trim that may have occurred during installation. Address any issues immediately while materials and tools are readily available.
Inspect exterior sealant thoroughly for gaps, inconsistencies, or missed areas that could allow water or air infiltration. Pay special attention to corners and joints where multiple materials meet.
Test the window operation extensively, opening and closing multiple times to ensure smooth function without sticking or binding. Verify that locks, latches, and all hardware function properly and align correctly.
Confirm that the window is weathertight with no visible gaps or drafts around the perimeter. Use a candle or incense stick on a breezy day to detect air leaks that require additional sealing.
Remove any protective films from glass and frames within manufacturer-recommended timeframes to prevent adhesive residue problems.
Phase 10: Final Clean-up and Maintenance Setup
Remove all installation debris promptly and dispose of old windows according to local regulations, which may have specific requirements for glass and treated materials. Many communities offer special disposal programs for construction materials.
Clean new windows inside and out with appropriate glass cleaners, avoiding abrasive materials that could scratch low-E coatings or damage hardware finishes. Proper initial cleaning establishes the foundation for easy ongoing maintenance.
Document warranty information carefully and keep all installation receipts for future reference. Most quality windows carry substantial warranties that require proper documentation for claims.
Schedule regular maintenance, including annual caulk inspection and hardware lubrication, to ensure optimal performance throughout the window’s lifespan. Preventive maintenance significantly extends window life and maintains energy efficiency.
Take photos of the completed installation for insurance documentation and future reference, particularly showing flashing tape application and trim details that may be helpful for future home maintenance.
Completing this step-by-step guide to the window replacement process transforms your home’s comfort, energy efficiency, and appearance. Whether you choose insert windows for their simplicity or full frame replacements for complete renovation, proper installation ensures decades of reliable performance.
The window replacement process requires patience and attention to detail, but the results justify the effort. Modern replacement windows provide superior insulation, noise reduction, and weather protection compared to older units, often paying for themselves through reduced energy bills over time. In competitive housing markets, the impact of window replacement on home resale value can be a meaningful advantage because buyers place real weight on efficiency, durability, and storm readiness.
Remember that complex installations, upper-story work, or situations involving structural modifications typically benefit from professional installation to ensure safety and warranty compliance.
Final Thoughts
Replacing your windows is a high-impact upgrade that improves comfort, energy efficiency, noise control, and home value. This guide walks through every phase, from planning and accurate measuring to choosing insert vs. full-frame options, safe removal, precise installation, and thorough sealing/insulation, so you can avoid drafts, prevent water damage, and get long-lasting performance. With careful prep, correct flashing, and proper finishing, new windows can deliver decades of reliable operation and noticeable savings.
For homeowners who want expert help and top-tier options, Advanced Window Products is a trusted choice for window replacement in Houston. Explore our full lineup of replacement windows, upgrade your home with energy-efficient windows, learn more about professional window installation, and consider added protection with durable hurricane windows. Ready to upgrade your home’s comfort and efficiency? Contact us today for a free consultation and quote on your window replacement project.
Frequently Asked Questions
How do I know if I need an insert or a full-frame replacement?
Choose insert replacement if your existing frame is level, square, and structurally sound without signs of rot or water damage. Opt for full-frame replacement if the frame is damaged, significantly out of square, or if you want to change the window size. Full frame replacement also allows for better insulation and modern flashing integration.
What’s the difference in installation time between insert and full-frame windows?
Insert windows typically take 1-2 hours per window since they use the existing frame structure, while full-frame replacements take 4-6 hours per ground-level window due to complete frame removal, opening preparation, and reconstruction requirements.
Can I install replacement windows in winter weather?
While possible, winter installation isn’t recommended due to temperature fluctuations affecting sealant performance and the discomfort of having openings exposed to cold air. Spring and fall offer ideal installation conditions with moderate temperatures and lower humidity.
How do I handle windows on upper floors safely?
Upper-story window replacement requires proper scaffolding, safety equipment, and experience working at heights. Most homeowners should hire professional contractors for second-floor and higher installations to ensure both safety and proper installation techniques.
What should I do if my measurements don’t match standard window sizes?
Custom-sized windows can be ordered from most manufacturers, though they typically cost 20-30% more and require 4-6 weeks for delivery. Alternatively, you might modify the opening during full-frame replacement to accommodate standard sizes, which can be more cost-effective for significant size differences.