 Skip to main content Skip to footer
New windows should improve comfort, efficiency, and curb appeal, but only when they’re installed correctly. Poor workmanship can quietly lead to drafts, water intrusion, rising energy costs, and long-term structural damage. Many installation mistakes aren’t obvious at first glance, which makes early awareness essential. Understanding what to look for can help you avoid expensive repairs and protect your investment. In this blog, we’ll break down the most common warning signs homeowners should watch for after new windows are installed.
Key Takeaways
- Bad window installation typically reveals itself quickly through visible gaps, drafts, water leaks, sticky operation, and fog between panes, often within the first season after your windows are installed.
- These problems can drive up your energy bills, cause interior water damage, and even void your window manufacturer’s warranty if the installation wasn’t done to specification.
- Drafty or poorly sealed windows also let in more outside noise, while correctly installed hurricane impact-resistant windows can make your home approximately 30% quieter in everyday conditions, great news if you live on a busy street.
- Obvious issues like crooked frames, messy caulking, and water stains should be documented with photos and addressed with the original installer immediately.
- Working with a reputable, licensed window installation company that uses custom-sized windows (typically manufactured in 4–6 weeks) helps homeowners avoid these costly mistakes from the start.
Warning Signs of Bad Window Installation
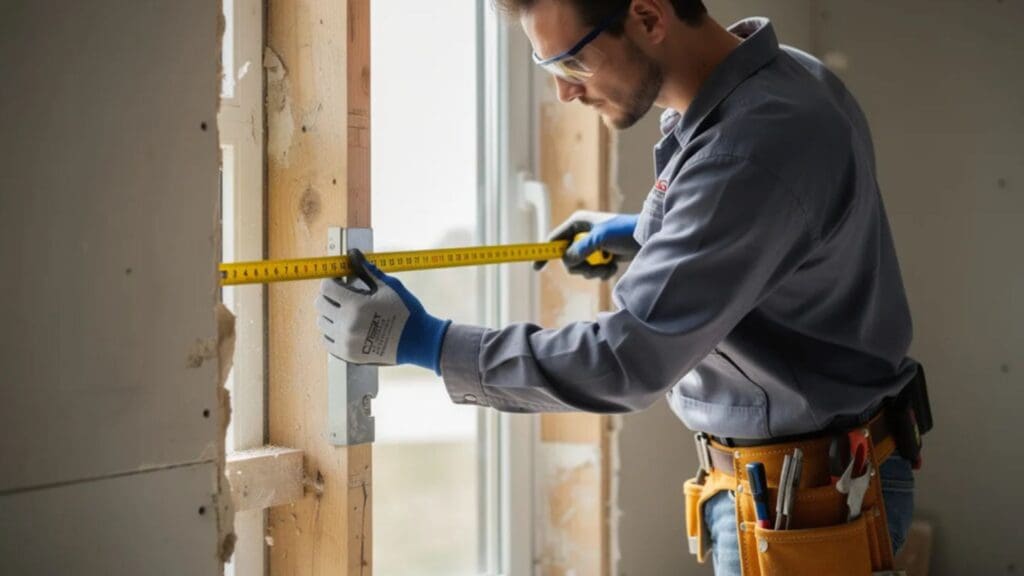
When your new windows are installed properly, they should look straight, operate smoothly, seal tightly, and protect your home from rain and strong winds. You shouldn’t have to wrestle with a stubborn sash, notice cold air creeping in around the frame, or see water pooling on your windowsill after a storm. Functional windows are the result of careful measurement, quality products, and skilled installation working together.
Unfortunately, poor window installation is more common than most homeowners realize. Most window manufacturers in the U.S. clearly exclude “improper installation” from their product warranties. This means if your windows fail due to a contractor’s error, the manufacturer won’t cover the repair or replacement. The burden falls squarely on the installer, and ultimately, on you if you can’t get them to make it right. Understanding the benefits of professional vs DIY window installation helps homeowners avoid warranty issues and long-term structural damage.
Here are the main warning signs: visible gaps between the sill and frame, drafty windows, water damage around your windows, operational failure, messy or incomplete caulking, fog or condensation between the panes, and windows that look out of level or just “not right.” These problems can appear within days of installation, though some moisture and rot issues may only become obvious after your first rainy season or a strong storm.
Gaps Between the Sill and Frame
There should be no visible daylight or open cracks between your window frame and the sill, jambs, or trim once the trim and caulking work is complete. If you can see obvious gaps, something went wrong during installation.
Typical gap locations include:
- Along the bottom edge of the sill
- At the top corners where the frame meets the header
- Between the frame and the drywall on the interior
- Where exterior cladding (brick, stucco, or siding) meets the window
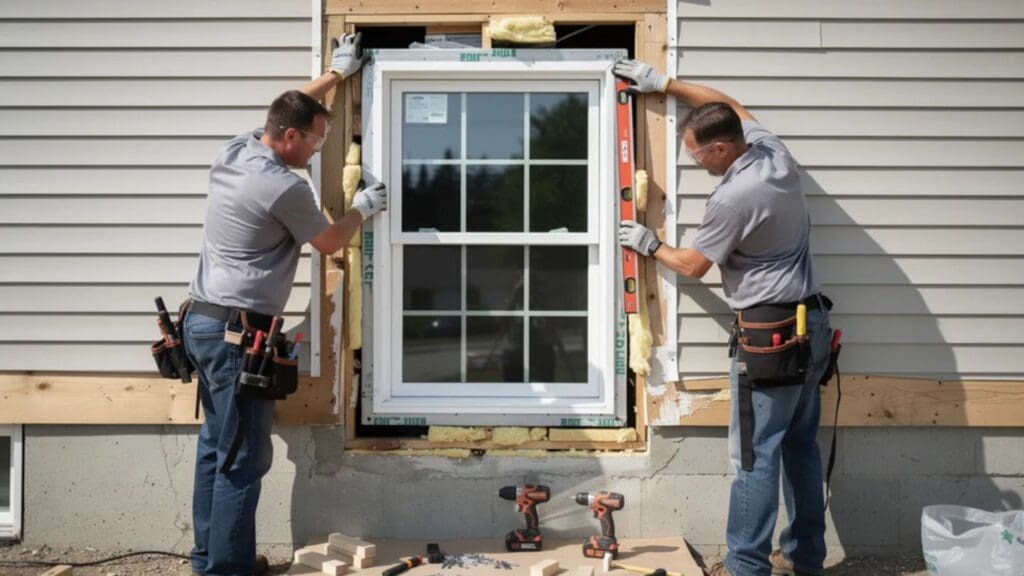
Gaps usually mean the window opening was measured incorrectly or the installer tried to “force-fit” a window that was slightly too small or too large. When a window doesn’t fit perfectly in the rough opening, installers sometimes try to make it work anyway, and the results show.
These visible gaps create immediate problems. They allow air leaks that affect your energy efficiency, let in insects and dust, and set the stage for water intrusion and eventual wood rot around the opening. What starts as a cosmetic issue can quickly become structural damage.
Drafty Windows
Brand-new windows, especially modern double- or triple-pane units, should feel airtight in normal weather once installation is complete. If you’re feeling a breeze near your newly installed windows on a calm day, that’s a red flag.
Simple draft tests:
- Hold a lit incense stick or candle near the frame on a windy day and watch for smoke movement
- Tape a thin strip of tissue paper near the frame edges and see if it flutters
- Run your bare hand slowly along all edges of the closed window to feel for air movement
Drafts typically come from poor insulating foam around the frame, missing flashing tape, or a sash that doesn’t sit tightly in its track due to misalignment. These aren’t minor oversights, they’re clear signs the installation process was rushed or done incorrectly.
The connection to your utility bills is direct and measurable. Even small leaks around several windows can noticeably increase your energy costs within one or two billing cycles. Drafty windows force your HVAC system to work harder, and you’ll see those high energy bills as a result. When installed with precision, maximizing window efficiency, installation warranties, and ROI becomes a realistic long-term benefit for homeowners.
A tight, correctly installed hurricane impact-resistant window system not only improves energy performance but can also make your home significantly quieter day to day. If you live on a busy street or have loud neighbors, properly installed replacement windows can reduce outside noise by about 30%, a benefit you’ll appreciate every time you’re trying to relax at home.
Water Damage Around Your Windows

Water intrusion is one of the most serious consequences of bad window installation. This isn’t a minor inconvenience; it can lead to mold growth, rot, and significant structural damage if not addressed quickly. Window leaks often show up after the first heavy rain, a coastal storm, or a winter freeze-thaw cycle. Timing projects strategically with guidance from tips for installing replacement windows before the winter can improve comfort and seasonal performance.
Early warning signs of water damage:
- Bubbling paint or peeling paint around the window frame
- Yellow or brown stains on drywall near the window
- Wrinkled or bubbling wallpaper
- Musty or bad smells near the window area
- Pooling water on the sill after rain
Advanced warning signs:
- Visible mold on sills, baseboards, or nearby trim
- Soft, spongy wood when you press on the frame or the surrounding wall
- Paint or wallpaper that’s discolored or separating from the wall
Water leaks typically result from improper flashing, skipped sill pans, or poorly sealed nail fins. These installation shortcuts allow water to run behind the siding and into the wall cavity instead of shedding away from the house. By the time you notice stains or mold, the damage may have been happening for weeks or months.
Check around your newly installed windows after the next few rain events. Document any leaks or damp spots with dated photos, this serves as proof of improper installation if you need to pursue a warranty claim or request repairs from the installer.
Operational Failure
New windows installed in 2024 or later should open, close, and lock with minimal effort. They shouldn’t scrape, bind, feel loose, or require you to wrestle them into position. If operating your windows feels like a workout, something is wrong.
Common operational problems:
| Window Type | Problem Signs |
| Double-hung | Sashes slide unevenly, tilt mechanisms don’t engage, and windows won’t stay open. |
| Casement | Crank requires excessive force; the window doesn’t seal flush when closed. |
| Slider | Jumps off track, drags or sticks, won’t slide smoothly |
| All types | Locks don’t line up with keepers, and latches won’t engage. |
These issues are often caused by frames that are not square or level, shims installed incorrectly, or fasteners overtightened on one side of the frame. When a window is installed incorrectly, even slightly, the hardware can’t function as designed.
Operational problems tend to worsen over time as components wear and your home’s structure moves slightly with temperature and humidity changes. A window that’s slightly difficult to close today may become nearly impossible to operate in a year or two.
Messy or Incomplete Caulking
Caulking might seem like a minor finishing detail, but it’s actually a critical part of the air and water barrier around each window. It’s also a visible indicator of the installer’s overall craftsmanship and their attention to the details you can’t see.
What good caulking looks like:
- Smooth, even beads without gaps or pinholes
- Consistent width throughout
- No heavy smears or blobs
- Color that matches the trim when possible
- Clean edges without excess material on brick, stucco, or siding
Warning signs of messy caulking:
- Thick, uneven globs
- Skipped sections, especially at corners
- Cracking or detaching caulk within weeks of installation
- Caulk smeared across surrounding surfaces
One important note: the bottom edge on many modern window systems is designed to drain water away. Over-caulking the sill area can actually trap water instead of allowing it to escape, creating the very water damage the caulk was meant to prevent.
Sloppy caulking often indicates the installer rushed the job. If they cut corners on visible work, there’s a good chance they took the same shortcuts on hidden details like flashing, insulation, and fastener placement. Messy caulking should prompt you to look more carefully at other aspects of the installation.
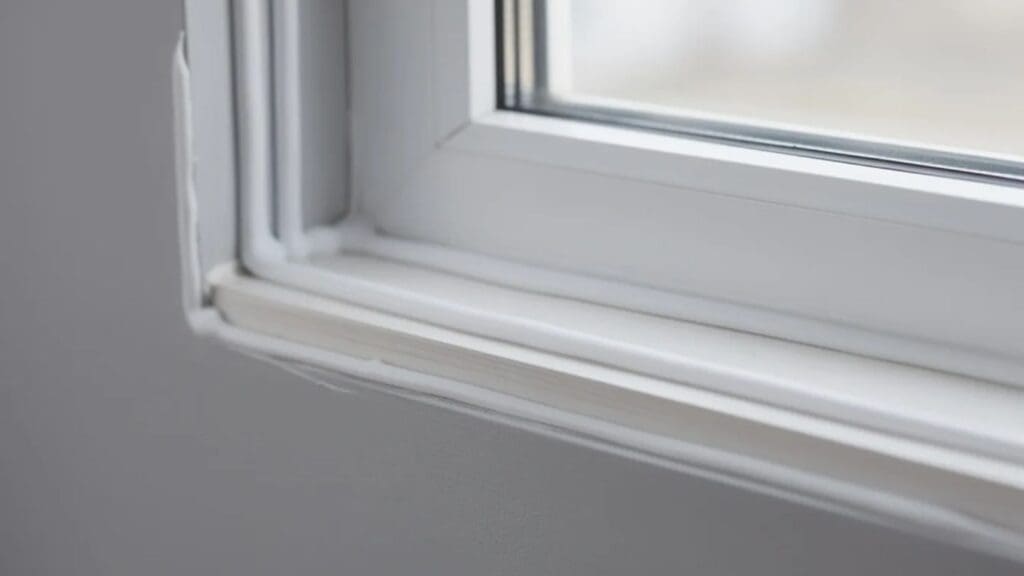
Fog or Condensation Between the Panes
Insulated glass units (IGUs) are factory-sealed chambers between your window panes, often filled with argon or similar gas to improve energy efficiency. When installed correctly, these sealed units should remain clear for many years, often the full lifespan of the window.
If you notice persistent fogging, haziness, or mineral streaks trapped between the panes, the perimeter seal has failed, and outside moisture has entered the unit. This is a broken seal that compromises the window’s insulating properties.
Common causes of premature seal failure:
- Rough handling during installation
- Twisting of the frame during installation
- Overtightened clips that stress the glass
- Improper storage before installation
Here’s a key point: cleaning the interior and exterior glass will not remove this fogging. If you clean both sides and the cloudiness remains, the problem is between the panes. This helps distinguish seal failure from normal surface condensation, which wipes away easily.
Check your warranty paperwork carefully. Many glass manufacturers offer separate coverage for seal failure, but they may deny claims if there’s evidence of incorrect installation. This is another reason why choosing a qualified installation company matters, improperly installed windows can leave you without warranty protection when you need it most.
Windows Out of Level or Just “Not Right”
Correctly installed windows should look straight and symmetrical from both inside and outside your home. The reveals (the visible margins around the sash) should be even, and the head and sill lines should appear parallel to the floor.
Simple visual checks:
- Stand back 8–10 feet and look at the window straight on
- Check if the top and bottom lines look parallel to the floor
- Compare the left and right margins around the sash, they should match
- Look at how the window relates to nearby trim, doors, or other windows
If anything looks crooked or uneven to your eye, trust your instincts. You can use a basic bubble level or a smartphone level app on the sill and side jambs to confirm what you’re seeing.
Out-of-level windows are more than a cosmetic issue. They cause:
- Locks to misalign, compromising security
- Sashes to drag or bind during operation
- Weatherstripping to wear unevenly and fail prematurely
- Increased likelihood of leaks as gaps develop
Call attention to any “crooked” or uneven-looking windows before the installer leaves your property. Re-shimming and adjusting are much easier at that stage than months later, after the crew has moved on to other jobs.
What to Do If You Suspect Improper Installation
If you’re noticing any of these signs of poor installation, act quickly. Don’t wait for the next rainy season or energy bill spike to confirm what you already suspect. Poorly installed windows cause problems that compound over time, catching them early limits the damage and strengthens your case for getting repairs done right. Proper planning and preparation, and understanding how to prepare for a window installation in your home, can significantly reduce the risk of costly installation mistakes.
Document everything:
- Take clear photos of problem areas with good lighting
- Write down the installation date and when issues first appeared
- Keep copies of contracts, invoices, and warranty documents
- Note the names of the installer and any crew members you dealt with
If the original installer refuses to respond or correct the problems, you have options:
- Contact the window manufacturer directly
- Reach out to local licensing boards
- Request an inspection from your local building department
- Consult with another licensed window contractor for a professional assessment
At our company, we use custom-sized, hurricane impact-resistant windows manufactured in about 4–6 weeks and installed by trained crews specifically to avoid these issues. We believe that proper window installation starts with accurate measurements and quality products, not trying to make a wrong-size window fit where it doesn’t belong.
If you’re dealing with the aftermath of a bad window installation, or if you want to avoid these problems entirely with your next window replacement project, we’re happy to take a look. Schedule an inspection or request a free estimate, and let’s make sure your windows are done right.
Protect Your Home with the Right Installation
A poor window installation can lead to drafts, water damage, rising energy bills, and long-term structural issues. Recognizing the warning signs early helps you avoid costly repairs and protect your comfort. Investing in professional workmanship ensures your windows perform efficiently, look great, and stand strong for years to come.
Advanced Window Products delivers trusted expertise for reliable window installation in League City, ensuring long-lasting performance and value. We provide hurricane windows, all replacement windows, energy-efficient windows, and window installation tailored to your home’s needs. Contact us today to schedule your consultation and experience quality craftsmanship you can count on.
Frequently Asked Questions
How soon after installation will problems with my windows usually show up?
Some problems appear immediately, such as crooked frames, gaps, or difficult operation. Drafts often surface during the first heating or cooling season. Moisture damage or mold may take months, typically becoming noticeable after heavy rains or seasonal weather changes.
Can a bad installation really void my window warranty?
Yes, many manufacturers exclude improper installation from warranty coverage. If windows are installed incorrectly, repairs or replacements may not be covered. Labor warranties from the installer often become your only protection, making it essential to review all terms carefully.
Is it possible to fix a bad installation without replacing the entire window?
Minor issues like poor insulation, improper shimming, or failed caulking can often be corrected without full replacement. However, significant water damage, frame warping, or persistent leaks may require complete removal and proper reinstallation to prevent further structural problems.
Are hurricane impact-resistant windows harder to install correctly?
Hurricane impact-resistant windows are heavier and require precise anchoring to meet performance standards. Proper measurement, alignment, and secure fastening are critical. When installed correctly by experienced professionals, they function like standard windows while offering superior storm protection.