

After investing in new windows for your home, you want the peace of mind that comes with knowing the job was done right. Poor window installation can lead to drafts, water leaks, and higher energy bills that’ll cost you for years to come. The good news? You don’t need to be a contractor to spot the signs of quality workmanship versus a bad window installation.
Whether your window replacement was completed yesterday or months ago, taking time to inspect the work can help you catch problems early – when they’re easier and less expensive to fix. A properly installed window should enhance your home’s comfort, energy efficiency, and value. Here’s how to tell if your windows are installed correctly and what to do if they aren’t.
Key Takeaways
- Properly installed windows should open and close smoothly without sticking, squeaking, or requiring excessive force
- Check for visible gaps between the window frame and wall, as these indicate poor installation and lead to energy loss
- Test for drafts around window edges using a lit candle or tissue paper on windy days to detect air leaks
- Look for water stains, peeling paint, or mold around windows as signs of moisture infiltration from faulty installation
- Professional installations should include clean caulking, level frames, and come with both product and workmanship warranties
Visual Inspection of Window Installation
Start your inspection with a careful visual examination of each window. This doesn’t require any special tools – just your eyes and attention to detail.
Check if windows appear level and square within their frames using a carpenter’s level. A properly installed window will sit perfectly straight both horizontally and vertically. If you notice any obvious tilting or angling, that’s a red flag that the installer didn’t take proper window measurements or may have rushed the job.
One of the easiest ways to judge workmanship is to compare what you’re seeing to the kinds of common window installation mistakes and how to avoid them. Issues like uneven shimming, over-tightened screws that warp the frame, or gaps that were never properly insulated tend to show up visually first. If something looks slightly off now, it often becomes a bigger comfort or moisture problem later.
Look for any bowing, warping, or parallelogram shape that indicates improper installation pressure. When installers over-tighten screws or use too much force during installation, it can distort the window frame. This creates an improperly installed window that won’t operate smoothly and may fail prematurely.
Verify that window grilles and mullions are straight and properly aligned. These decorative elements should enhance your home’s appearance, not detract from it. Crooked or misaligned features often indicate careless work.
Testing Window Functionality and Operation
A window that looks good but doesn’t work properly is still a poorly installed window. Functionality testing helps you identify operational problems that could worsen over time. Homeowners are often surprised by how much the benefits of professional vs DIY window installation show up in everyday use.
Open and close each window sash to ensure smooth operation without binding or sticking. You shouldn’t have to use excessive force or struggle with any window. If you notice resistance, squeaking, or rough spots during operation, the installer may have damaged the operating mechanisms or installed the unit incorrectly.
Test window locks and latches to verify they engage properly and hold securely. Security and proper sealing depend on these mechanisms working correctly. Locks that don’t align or require excessive pressure to engage suggest the window frame may be out of square.
Check that double-hung windows stay open at various positions without sliding down. A properly installed window includes properly adjusted balance springs or weights that should hold the sash in place. If windows won’t stay open, it’s a clear sign of improper installation or damaged hardware.
Verify that casement windows close tightly against their seals without gaps. The sash should compress the weatherstripping evenly around the entire perimeter when closed and locked.
Listen for unusual squeaking, grinding, or scraping noises during operation. While some new windows may have slight adjustment sounds initially, persistent or loud noises indicate problems that will likely get worse over time.
Detecting Air Leaks and Drafts
Air leaks are one of the most common problems with improperly installed windows, and they directly impact your energy costs and indoor comfort.
Use a lit candle or tissue paper around the window edges on a windy day to detect air movement. Hold the flame or paper close to the window frame and watch for flickering or movement that indicates drafts. Pay special attention to corners and the bottom sill, where problems commonly occur. Draft testing also connects closely to the real-world window installation timeline and what homeowners can expect. Air sealing and insulation aren’t quick final touches; they’re core steps that happen after leveling and before trim goes on.
Feel for temperature differences near windows during hot or cold weather. On a cold day, you shouldn’t feel noticeably cooler air near a properly sealed window. Similarly, on hot summer days, warm air shouldn’t be noticeably entering around window edges.
Check for visible light coming through closed windows from outside at night. Turn off interior lights and look for light streaks around the window perimeter. Any visible light indicates gaps that will also allow air infiltration.
Examine weatherstripping for proper compression when windows are closed. The seals should compress evenly without being over-compressed (which can damage them) or under-compressed (which allows leaks).
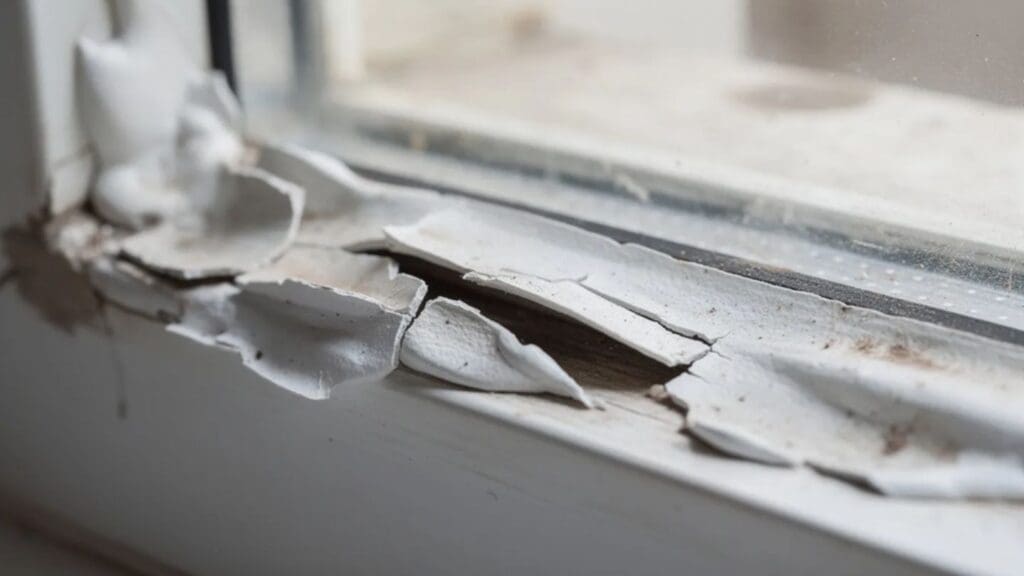
Checking for Water Infiltration Issues
If you’re unsure what “good” weatherproofing should look like, think about the standards highlighted in an expert interview on what to look for in a window installation service. Here’s what to watch for:
Inspect window sills and surrounding walls for water stains, discoloration, or peeling paint. These signs often appear gradually, so check periodically rather than just once. Water damage typically shows as brown or yellow stains, bubbling paint, or soft spots in drywall.
Look for signs of mold or mildew growth around window frames. Moisture problems from poor installation create ideal conditions for mold, which poses health risks and indicates ongoing water infiltration issues.
Check for condensation between double or triple-pane glass, which indicates a broken seal. This problem typically results from improper handling during installation or manufacturing defects, but either way requires window replacement to restore energy efficiency.
Examine the exterior caulking for cracks, gaps, or missing sections. Quality caulk should form a continuous seal between the window frame and the exterior wall. Cracked or missing caulk allows water to penetrate behind the window, potentially causing extensive damage.
Verify proper drainage by checking that weep holes are clear and functioning. These small holes at the bottom of window frames allow accumulated moisture to drain out rather than build up inside the frame.
Examining Installation Quality Details
The details of professional installation separate quality work from poor window installation. Here’s what properly installed windows should include:
Caulking and Sealing Quality
Look for neat, continuous caulk lines without gaps, cracks, or excess material. Professional installers take pride in clean caulk lines that enhance rather than detract from your home’s appearance. Sloppy caulking often indicates rushed work or inexperienced installers.
Check that caulking is the appropriate type for exterior versus interior applications. Exterior caulk must be weather-resistant and paintable, while interior caulk should be designed for indoor use and easy touch-ups.
Verify that all joints between the window frame and the wall are properly sealed. This includes the top, sides, and bottom of the frame. Missing caulk in any area can lead to water and air infiltration.
Examine corner joints for complete coverage without air pockets. Corners are particularly vulnerable to water penetration, so they require careful attention during installation.
Frame Alignment and Fit
Measure diagonally across window frames to ensure they are square – measurements should be equal from opposite corners. A window that’s out of square won’t operate properly and may develop operational problems over time.
Check that windows are flush with the wall surface without protruding or receding. Proper installation positions the window at the correct depth for both appearance and performance.
Verify that window frames are plumb and level using appropriate measuring tools. This affects both appearance and function – windows that aren’t properly aligned look wrong and may not operate smoothly.
Look for a consistent reveal around the window opening. The visible gap between the window frame and interior trim should be uniform, creating a professional appearance.
Warning Signs Requiring Immediate Attention
Some installation problems demand quick action to prevent further damage or safety issues:
Large visible gaps (more than 1/4 inch) between the window frame and the rough opening indicate serious installation errors. These gaps compromise energy efficiency and can allow water infiltration that damages your home’s structure.
Windows that won’t stay open or completely fail to open or close create safety hazards, especially in bedrooms where windows serve as emergency exits. Immediate repair or replacement may be necessary.
Active water leaks during rain or signs of ongoing moisture damage require urgent attention. Water damage spreads quickly and can create expensive structural damage and health hazards from mold growth.
Severe condensation between glass panes that obscures visibility indicates failed window seals. While not immediately dangerous, this problem eliminates the energy efficiency benefits you paid for and typically requires window replacement.
Complete absence of warranties or documentation from the installer suggests you may be dealing with an unlicensed or unprofessional company. Legitimate contractors stand behind their work with workmanship warranties.
What to Do If You Discover Installation Problems
Finding problems with your window installation can be frustrating, but taking the right steps helps ensure proper resolution:
Document all issues with photos and detailed written descriptions. Create a record showing the extent and location of problems. This documentation will be valuable whether you’re working with the original installer or need to involve other parties.
Contact the installation contractor immediately to report problems and request an inspection. Most reputable companies want to address issues quickly to maintain their reputation and comply with warranty terms.
Review your contract and warranty terms to understand coverage and time limits. Both product warranties and workmanship warranties may apply to different aspects of the problems you’ve discovered.
Before you call the installer back, it helps to organize your concerns the same way you would when thinking through questions to ask when hiring a window installer. Ask what specific part of the install caused the issue, how they plan to correct it, and whether the repair will include re-sealing, re-flashing, or re-leveling the frame. Clear, specific questions make it harder for real problems to be dismissed as “normal settling.”
Consider involving your local building code enforcement if safety issues are present. Building inspectors can determine if work meets local codes and may be able to require corrections from licensed contractors.
Keep records of all communications and repair attempts for potential legal action. If problems aren’t resolved through normal channels, documentation will be essential for insurance claims or legal proceedings.
Final Thoughts
Checking your windows after installation doesn’t take special skills, just a careful look and a few simple tests. When windows are installed correctly, they sit level and square, operate smoothly, seal tightly against drafts, and show no signs of moisture intrusion. By inspecting gaps, caulking quality, frame alignment, and day-to-day performance, you can catch small issues early before they turn into bigger problems like leaks, mold, or rising energy bills. If anything feels off, documenting the issue and contacting your installer quickly is the best way to protect your home and your investment.
For homeowners who want expert help or added peace of mind, Advanced Window Products is a trusted local option for window installation in Houston. Whether you’re considering hurricane windows, exploring all replacement windows, or upgrading to energy-efficient windows, their team focuses on precise fitting, clean sealing, and long-term performance. If you ever suspect a problem, or you’re planning your next upgrade, working with experienced professionals can make all the difference in getting the job done right the first time.
Frequently Asked Questions
How long should I wait before checking if my new windows were installed properly?
You should perform a basic inspection immediately after installation and a more thorough check within 24-48 hours. Some issues, like condensation or settling, may take a few days to become apparent, but major problems, like operational failures or large gaps, should be obvious right away.
What’s the difference between normal settling and improper installation?
Normal settling involves minor adjustments within the first few weeks, while improper installation shows immediate major problems like large gaps, operational failures, or water leaks. Properly installed windows should function correctly from day one, with only minimal settling that doesn’t affect operation or sealing.
Can I fix minor installation issues myself, or should I call the contractor?
Minor caulking touch-ups might be DIY-friendly for handy homeowners, but any structural issues, operational problems, or water leaks should be addressed by the installer to maintain warranty coverage and ensure proper repairs. Attempting major fixes yourself could void warranties and potentially make problems worse.
How do I know if my windows meet local building codes?
Contact your local building department to verify if permits were pulled and inspections completed. Most jurisdictions require permits for window replacement, and inspections ensure code compliance for safety and energy efficiency. If permits weren’t obtained, you may have recourse against the contractor.
What should I do if the installation contractor is no longer in business?
Check if your windows have manufacturer warranties that cover installation defects, contact your homeowner’s insurance company to see if policy coverage applies, and consider hiring a qualified contractor to assess and repair issues while documenting everything for potential insurance claims or legal action against the failed business.